Flask is a web micro framework written in Python that allows us to quickly implement a website or web service using the Python language. This article refers to the official Flask documentation. Most of the code is referenced from official documentation.
Install Flask
First we will install Flask. The easiest way is to use pip.

Pip install flask
Then open a Python file, enter the following content and run the file. Then visit localhost:5000 and we should see the Hello Flask! output on the browser.
From flask import Flaskapp = Flask(__name__)@app.route('/')def hello_world(): return 'Hello Flask!'if __name__ == '__main__': app.run()
Quick start
Debug mode
We modify the output in the code and check for changes on the browser. If you do it, you can see no change. In fact, Flask has built-in debug mode that can automatically reload code and display debugging information. This requires us to turn on debugging mode. The method is very simple. Set the FLASK_DEBUG environment variable and set the value to 1.
Then run the program again and you will see this output. If you modify the code again at this time, you will find that Flask will restart automatically this time.
* Restarting with stat* Debugger is active!* Debugger PIN: 157-063-180* Running on http://127.0.0.1:5000/ (Press CTRL+C to quit)
routing
The use of routing can be seen in the above example. If you know Spring Web MVC, you should be familiar with routing. Routing is set by using Flask's app.route decorator, which is similar to Java's annotations.
@app.route('/')def index(): return 'Index Page'@app.route('/hello')def hello(): return 'Hello, World'
Path variable
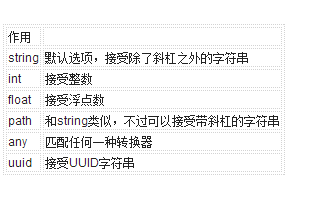
If you want to get path parameters such as /article/1, you need to use path variables. The path variable syntax is /path/
converter

Here is an official Flask example.
@app.route('/user/
Construct URL
In a Web application, it is often necessary to obtain the URL of a certain page. In Flask, you need to use url_for('method name') to construct the URL of the corresponding method. Here is an official Flask example.
>>> from flask import Flask, url_for>>> app = Flask(__name__)>>> @app.route('/')... def index(): pass...>>> @app.route( '/login')... def login(): pass...>>> @app.route('/user/
HTTP method
If you need to deal with specific HTTP methods, it is also very easy to use in Flask. You can use the methods parameter setting of the route decorator.
From flask import te('/login', methods=['GET', 'POST'])def login(): if request.method == 'POST': do_the_login() else: show_the_login_form()
Static files
Web applications often need to handle static files. In Flask you need to use the url_for function and specify the static endpoint name and file name. In the following example, the actual file should be placed under the static/ folder.
Url_for('static', filename='style.css')
Template generation
Flask uses Jinja2 as a template by default, Flask will automatically configure the Jinja template, so we don't need any other configuration. By default, the template file needs to be placed under the templates folder.
To use the Jinja template, just use the render_template function and pass in the template file name and parameter name.
From flask import te('/hello/')@app.route('/hello/
The corresponding template file is as follows.
Hello {{ name }}!
{% else %}Hello, World!
{% endif %}Log output
Flask pre-configured a Logger for us, we can use directly in the program. This Logger is a standard Python Logger, so we can configure it to a standard Logger. For details, see the official documentation or my article Python Log Output.
App.logger.debug('A value for debugging')app.logger.warning('A warning occurred (%d apples)', 42)app.logger.error('An error occurred')
Processing request
Request parameters in Flask need to use several global objects like request, but these global objects are special. They are Context Locals , which is actually a proxy for local variables in the Web context. Although we use global variables in the program, they are different for each request scope. Understand this, the latter is very simple.
Request object
The Request object is a global object. Using its properties and methods, we can easily obtain the parameters passed from the page.
The method attribute returns a similarity to the HTTP method, such as post and get. The form attribute is a dictionary. If the data is a POST type form, it can be obtained from the form attribute. The following is an official Flask example that demonstrates the method and form attributes of the Request object.
From flask import te('/login', methods=['POST', 'GET'])def login(): error = None if request.method == 'POST': if valid_login(request.form['username' ], request.form['password']): return log_the_user_in(request.form['username']) else: error = 'Invalid username/password' # the code below is performed if the request method # was GET or the credentials Were invalid return render_template('login.html', error=error)
If the data is sent by the GET method, it can be obtained using the args attribute. This attribute is also a dictionary.
Searchword = request.args.get('key', '')
File Upload
Using Flask can also easily obtain the uploaded file in the form. You only need to use the files attribute of the request. This is also a dictionary containing the uploaded file. If you want to get the uploaded file name, you can use the filename attribute, but note that this attribute can be changed by the client, so it is not reliable. A better approach is to use the secure_filename method provided by werkzeug to obtain a safe file name.
From flask import requestfrom werkzeug.utils import te('/upload', methods=['GET', 'POST'])def upload_file(): if request.method == 'POST': f = request.files['the_file '] f.save('/var/' + secure_filename(f.filename))
Cookies
Flask can also handle cookies easily. The method of use is very simple. Just look at the official example. The following example is how to get a cookie.
From flask import te('/')def index(): username = request.cookies.get('username') # Use cookies.get(key) instead of cookies[key] Avoid # Get KeyError If the cookie does not exist
If you need to send a cookie to the client, refer to the following example.
From flask import te('/')def index(): resp = make_response(render_template(...)) resp.set_cookie('username', 'the username') return resp
Redirection and errors
The redirect and abort functions are used to redirect and return error pages.
From flask import abort, redirect, te('/')def index(): return redirect(url_for('login'))@app.route('/login')def login(): abort(401) this_is_never_executed()
The default error page is an empty page. If you need a custom error page, you can use the errorhandler decorator.
From flask import orhandler(404)def page_not_found(error): return render_template('page_not_found.html'), 404
Response processing
By default, Flask automatically decides how to handle the response based on the return value of the function: if the return value is a response object, it is passed directly to the client; if the return value is a string, the string is converted to an appropriate response object. . We can also decide for ourselves how to set the response object. The method is also very simple. Use the make_response function.
@app.errorhandler(404)def not_found(error): resp = make_response(render_template('error.html'), 404) resp.headers['X-Something'] = 'A value' return resp
Sessions
We can use the global object session to manage user sessions. Sesison is built on Cookie technology, but in Flask we can also specify a key for the Session so that the information stored in the Cookie is encrypted and therefore more secure. Look directly at the official Flask example.
From flask import Flask, session, redirect, url_for, escape, requestapp = Flask(__name__)@app.route('/')def index(): if 'username' in session: return 'Logged in as %s' % escape (session['username']) return 'You are not logged in'@app.route('/login', methods=['GET', 'POST'])def login(): if request.method == ' POST': session['username'] = request.form['username'] return redirect(url_for('index')) return '''
'''@app.route('/logout')def logout(): # remove the username from the session if it's there session.pop('username', None) return redirect(url_for('index'))# set The secret key. keep this really secret:app.secret_key = 'A0Zr98j/3yX R~XHH!jmN]LWX/,?RT'Template Introduction
Here's a brief introduction to the use of Jinja templates. See the original documentation for details.
Template tag
In fact, the Jinja template is similar to the template of other languages ​​and frameworks. In any case, the syntax is used to replace specific elements in the HTML file with actual values. If you have used templates such as JSP, Thymeleaf, etc., you should be able to easily learn to use Jinja templates.
In fact, from the above example we should be able to see the basic syntax of the Jinja template. The code block needs to be contained in a {% %} block, such as the following code.
{% extends 'layout.html' %}{% block title %}Home{% endblock %}{% block body %}
Homepage
The contents of the double braces will not be escaped, everything will be output as is, it is often used with other helper functions. Below is an example.
inherit
The template can inherit other templates, we can set the layout as a parent template, so that other templates inherit, this can be very convenient to control the appearance of the entire program.
For example, here is a layout.html template, which is the layout file for the entire program.
Other templates can be written like this. Compare the concept of inheritance of object-oriented programming, we can easily understand.
{% extends 'layout.html' %}{% block title %}Home{% endblock %}{% block body %}
Homepage
This project demonstrates the simple use of Flask. Click the menu bar on the navigation bar to view the specific functions.
Control flow
Conditional judgments can be written like Java code in JSP tags, and Python code can also be written in {% %}. The following is an example of Flask's official documentation.
If you want to loop, you can write it like this, and it's almost like iterating through Python.
{% for key, value in data.items() %}It is important to note that not all Python code can be written in a template. If you want to reference functions of other files from a template, you need to explicitly register the function in the template. Can refer to this explosion stack questions.
Write last
This article mainly refers to Flask's official documents, but only introduces the most basic part of Flask. Understand this part, we can use Python to take a small server to do something. If you want to know more about usage of Flask, please pay attention to more detailed information. This article is to play a role in attracting jade.
By the way, I also learned about the execution speed of the Python language through Flask. We all know that the code compiled by the compiler is about tens to thousands of times faster than the interpreter interpreting code. When I was learning Java, I felt that Java was slow. The main reason was to wait for the compilation time to be long. Relatively speaking, writing scripts in Python is quite a bit, because there is no compilation process.
However, from the speed of Flask's operation, I personally felt that Python execution is indeed unpleasant. For example, write a controller in Spring, accept HTTP parameters, and display it on the page. If the program is compiled, the display process is basically instantaneous. But with the same requirements in Flask, I could actually feel a noticeable delay (approximately a few hundred milliseconds of waiting time). So, if you want to write a faster Web program, still use Java or JVM language, although watching the soil, performance is indeed leveraged.
400W Solar Panel,Residential Solar Panel Kits,Solar Panel System,320W Solar Panel
Jiangsu Stark New Energy Co.,Ltd , https://www.stark-newenergy.com
